Skip to content
As you stroll through the park, leash in hand and furry friend in tow, do you find yourself more dragged along than leading the way? If you’ve ever wondered, “Does a halter stop a dog from pulling?” you’re barking up the right tree. Let’s dive into this leashy conundrum and find out if a halter can help you regain control on those walkies.
Yes, a halter can help manage and reduce pulling by redirecting your dog’s head towards you whenever they try to pull, making it an effective tool for training and managing walks.
But why exactly do dog owners seek out halters, and do they work as well as promised? Stick around as we unleash the truth about halters and their effectiveness.
What is a Halter, and How Does It Work?
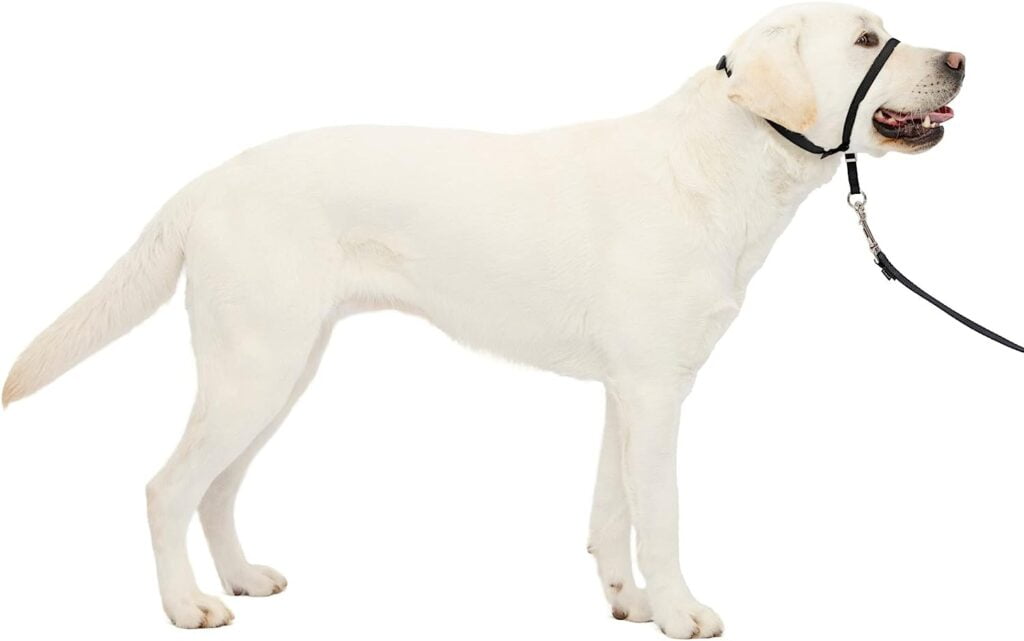
First off, let’s get a clear picture of our subject. A halter fits around a dog’s head and typically clips behind the ears and around the muzzle. Unlike traditional collars, halters give you control over the direction of your dog’s head, which is a pivotal point of guidance for any canine.
By controlling the head, a halter steers the dog’s entire body, making it easier to manage pulling behavior effectively. When your dog attempts to pull, the design of the halter redirects their head towards you, naturally discouraging the pulling action without causing pain or discomfort.
Advantages of Using a Halter
Halters are more than just pulling-preventive tools; they serve multiple beneficial roles in training and managing dogs. Here’s why many dog trainers and veterinarians recommend them:
- Enhanced Control: Halters provide significant control over your dog’s movements, especially useful for large or strong breeds.
- Safety for Sensitive Necks: They reduce strain on the neck by placing minimal pressure on the throat, which is particularly important for breeds prone to tracheal collapse.
- Effective Training Tool: Halters can be excellent for teaching dogs not to pull during walks, fostering better leash manners.
In summary, while a head halter can significantly reduce pulling by controlling the direction of a dog’s head and thus its body, it’s best used as a training aid rather than a permanent solution. It is important to pair its use with proper training techniques to achieve the best results and eventually transition to walking politely with a standard collar or harness.
Potential Drawbacks to Consider
While halters have their benefits, they’re not a one-size-fits-all solution. Consider these potential downsides before deciding if a halter is right for your dog:
- Neck and Spine Injury: If a dog lunges or pulls suddenly while wearing a head halter, the force exerted can strain the neck or spine. Because the halter controls the head, a sharp pull can cause a whiplash-like reaction.
- Nose and Facial Irritation: Improperly fitted head halters can rub the nose and facial area, causing irritation or injury. Repeated chafing can lead to discomfort and even wounds.
- Behavioral Stress: Some dogs may find head halters uncomfortable or distressing, particularly if not properly acclimated to wearing them. This discomfort can lead to stress and anxiety, which might manifest in resistance to wearing the halter or general unease during walks.
- Misuse and Overreliance: Over-reliance on a head halter without proper training techniques can lead to dependency, where a dog only behaves on walks when the halter is used. Additionally, incorrect use, such as pulling or yanking on the leash attached to the halter, can lead to negative experiences or injury.
- Escaping the Halter: Some dogs might learn to slip out of a head halter, especially if it is not correctly fitted, which could be dangerous if it occurs near traffic or in unsafe environments.
- Eye Injury: In rare cases, if the straps are not adjusted properly, they can slip into the dog’s eyes, especially during a correction or if the dog tries to paw at the halter, potentially causing eye irritation or injury.
- Public Perception and Misunderstanding: Some people might mistake a head halter for a muzzle and assume the dog is aggressive, leading to potential misunderstandings or negative interactions.
To mitigate these risks, it’s crucial to ensure the head halter is properly fitted and to use it as part of a comprehensive training approach that includes positive reinforcement. Gradual acclimatization to the halter can help reduce stress and resistance. Additionally, monitoring the dog during use for any signs of discomfort or irritation, and adjusting the use as necessary, is essential for safe and effective use.
How do I wear a head halter?
Wearing a head halter on your dog involves a few specific steps to ensure it is comfortable and effective. Here’s a straightforward guide on how to properly put on a head halter:
1. Introduction and Acclimatization
- Introduce Slowly: Before trying to put the head halter on, let your dog sniff it and explore it while offering treats and positive reinforcement. This helps your dog associate the halter with positive experiences.
- Gradual Exposure: Place the halter near your dog during pleasant activities like meal times or while playing, so they get used to seeing and being around it.
2. Fitting the Halter
- Adjust the Halter: Before putting it on your dog, adjust the straps to approximate your dog’s size. Most head halters have an adjustable neck strap and nose loop.
- Place the Neck Strap: Slip the neck strap of the halter over your dog’s head and position it high on the neck, directly behind the ears. This strap should be snug enough so that you can barely fit one finger underneath it.
- Fit the Nose Loop: The nose loop should be loose enough to allow your dog to fully open their mouth but not so loose that it can slip off the end of the muzzle. Ensure it’s below the eyes and not pressing into them.
3. Securing the Halter
- Buckle It Up: Once the neck strap and nose loop are correctly positioned, fasten any buckles or clips to secure the halter. Double-check that everything is snug but not too tight.
- Attach the Leash: Attach your leash to the ring at the bottom of the nose loop. This ring may sit below the chin.
4. Final Adjustments and Comfort Checks
- Comfort Check: Ensure the halter is not rubbing against your dog’s eyes or causing discomfort at any contact points.
- Freedom of Movement: Check that your dog can open their mouth to pant, drink, and eat treats. This is crucial for their comfort and to ensure the halter is not overly restrictive.
5. Training and Positive Reinforcement
- Use Positive Reinforcement: As you put on the halter and adjust it, continually reassure your dog with a calm voice and treat rewards. This can help mitigate any anxiety or resistance.
- Training Sessions: Begin using the halter during short walks or training sessions. Gradually increase the duration as your dog becomes more comfortable.
Tips:
- Never use the head halter as a punishment tool. It should always be associated with positive, enjoyable experiences.
- Avoid jerking the leash while it’s attached to a head halter as this could cause neck or head injuries.
- Regularly inspect the fit and condition of the halter to ensure it remains safe and comfortable for your dog.
Properly introducing and using a head halter can make walks more pleasant and safer for both you and your dog, especially if your dog tends to pull or if you need extra control.
How can I get my dog to accept a head halter?
Getting your dog to accept a head halter involves patience, positive reinforcement, and gradual acclimatization. Here’s a step-by-step guide to help your dog become comfortable with wearing a head halter:
1. Introduce the Halter Gradually
- Positive Association: Start by letting your dog sniff the halter and explore it at their own pace. During this introduction, offer treats and praise to create a positive association.
- Familiarization: Place the halter near your dog’s feeding area or with their favorite toys. This can help the dog see the halter as a non-threatening object.
2. Associate Halter with Rewards
- Feed Treats Through the Halter: Hold the halter open and feed your dog treats through the nose loop, encouraging them to stick their nose through voluntarily. Do not attempt to fasten it at this stage.
- Incremental Duration: Gradually increase the time the nose is in the loop during these treat sessions, always following up with rewards and praise.
3. Wearing the Halter Briefly
- Short Sessions: Once your dog is comfortable putting their nose through the loop, gently slip the halter on for a few seconds, then take it off. Reward immediately.
- Increase Wearing Time: Slowly increase the time the halter stays on, continuing to use treats and praise to maintain a positive experience.
4. Fastening the Halter
- Secure Gently: When your dog is comfortable with the halter being placed on their head, start fastening it. Do it gently and ensure it’s not too tight or causing discomfort.
- Distraction: After fastening the halter, distract your dog with a walk, play session, or more treats, so they associate wearing the halter with enjoyable activities.
5. Practice Walking
- Short Walks: Begin with short walks in a familiar area. Keep sessions positive and full of praise.
- Gradual Increase: As your dog becomes more comfortable, gradually increase the length and variety of walks.
6. Continuous Positive Reinforcement
- Ongoing Rewards: Continue to provide treats and positive interactions whenever the halter is on. Reinforce calm behavior and compliance with additional rewards.
7. Monitor for Any Issues
- Watch for Rubbing or Irritation: Regularly check if the halter is causing any irritation or discomfort, and adjust the fit as necessary.
- Behavioral Responses: Be attentive to how your dog reacts to the halter over time. Any negative changes in behavior may require revisiting your training approach or consulting a professional.
Tips:
- Patience is Key: Some dogs may take longer to accept the head halter. Never rush the process or force the halter on, as this can lead to fear or resistance.
- Keep Training Sessions Short and Sweet: This helps prevent your dog from becoming overwhelmed or stressed.
- Consult a Professional: If you encounter persistent difficulties or your dog shows signs of distress, consider consulting a professional dog trainer for additional guidance.
By following these steps and maintaining a positive and patient approach, you can successfully train your dog to accept and comfortably wear a head halter during walks.
When Should You Use a Halter?
Choosing the right situation to use a halter can optimize its benefits and minimize any discomfort for your dog. Here are some scenarios where a halter might be particularly useful:
- In Busy or Distracting Environments: Where control is crucial, and distractions are high.
- For Training Young or Reactive Dogs: Who haven’t yet mastered leash etiquette.
- During Rehabilitation: For dogs recovering from neck injuries where a collar could be harmful.
How to Ensure a Good Fit and Comfort
Proper fitting is crucial when it comes to using a halter. Here’s how to ensure a good fit:
- Consult a Professional: A veterinarian or experienced trainer can help you choose the right size and style of halter for your dog.
- Regular Checks: Regularly inspect the fit of the halter and make adjustments as needed to ensure it’s not too tight or loose.
- Conditioning to the Halter: Gradually acclimate your dog to wearing a halter by starting with short periods of use and gradually increasing them as your dog becomes more comfortable.
How do I use a head halter to train my dog?
Using a head halter can be a highly effective method for training dogs, particularly for managing pulling on the leash, improving focus, and overall control during walks. Here’s a step-by-step guide on how to use a head halter effectively:
Step 1: Choose the Right Head Halter
- Select a Well-Fitted Halter: Ensure the head halter fits properly. It should be snug around the dog’s neck and muzzle but not too tight. The strap around the nose should allow your dog to fully open its mouth but not slip off over its snout.
Step 2: Gradual Introduction
- Familiarization: Allow your dog to see and sniff the halter, placing it near their feeding area or with their favorite treats.
- Positive Association: Each time you show the halter to your dog, reward them with a treat to build positive associations.
- Slow Introduction: Place the halter on your dog for short periods initially, gradually increasing the time as they become more comfortable.
Step 3: Proper Fitting
- Adjust for Comfort: Adjust the halter so it fits comfortably. You should be able to fit one or two fingers under the neck and head straps.
- Consistent Check: Regularly check the fit, especially if your dog’s weight changes or if the halter stretches.
Step 4: Training Sessions
- Short Sessions: Start with short walks or training sessions using the halter. This helps your dog adjust without becoming overwhelmed.
- Control and Guidance: Use the leash attached to the halter to gently guide your dog’s head. Steering their head can redirect their entire body, providing effective control during training.
- Gentle Corrections: If your dog tries to pull or move in an unwanted direction, gently pull on the leash to redirect their head. Avoid sharp or strong jerks as these can cause discomfort or fear.
Step 5: Reinforce and Reward
- Positive Reinforcement: Consistently reward your dog for following commands and walking calmly with the head halter. Use treats, praise, or toys as incentives.
- Increase Duration Gradually: As your dog gets more comfortable with the halter, you can use it for longer walks or more complex training scenarios.
Step 6: Monitor and Adjust
- Observe Behavior: Watch for any signs of discomfort or irritation from the halter, such as pawing at it or rubbing their face against objects.
- Adjust as Needed: Make any necessary adjustments to the fit or length of time worn to ensure your dog remains comfortable.
Step 7: Combine with Other Training Tools
- Supplemental Tools: In some cases, integrating the head halter with other training methods like voice commands, hand signals, or a traditional collar can enhance overall training effectiveness.
Step 8: Transition and Phase Out
- Phasing Out: Once your dog has learned to walk calmly and follows commands consistently, you may begin to phase out the head halter, transitioning to a standard collar or harness if appropriate.
Using a head halter requires patience and consistency, but it can significantly improve your dog’s responsiveness and leash manners. Always ensure the training experience is positive and comfortable for your dog, and consider professional guidance if you encounter persistent issues.
Conclusion
While a halter can be a fantastic tool for managing pulling, it’s important to choose the right type, ensure a proper fit, and use it appropriately to avoid any potential issues. With the right approach, a halter can indeed help transform a puller into a well-mannered walking companion.
QQPETS is the leading wholesale dog harness manufacturer of adjustable harnesses for dogs and other items that people may use when walking their dogs. Our goal is to make dog walking easy for pet owners by providing valuable accessories. We offer a variety of customization services including custom logos, custom graphics, custom products and more. If you want to start your dog products business, check out our website and contact us today.
FAQ about dog
Can You Train a Dog Not to Pull with a Harness?
Yes, you can train a dog not to pull using a harness, especially if it is a no-pull harness. These harnesses typically have a front leash attachment point that discourages pulling by redirecting the dog towards you whenever they try to pull ahead. Training should also involve consistent positive reinforcement techniques, rewarding the dog for walking with a loose leash and maintaining pace beside you.
Will a Dog Harness Stop Pulling?
A dog harness, particularly a no-pull harness, can help manage and reduce pulling, but it does not automatically stop pulling without proper training. These harnesses are effective because they make pulling uncomfortable and less rewarding for the dog by redirecting their movement. However, consistent training and reinforcement are crucial for teaching the dog desirable leash behavior over time.
How Do I Stop My Dog from Extremely Pulling?
Stopping a dog from pulling, especially if the behavior is well-established, involves several steps:
- Use Appropriate Equipment: A no-pull harness with a front attachment point can help manage severe pulling. For some dogs, a head halter might be more effective, as it provides control over the dog’s head.
- Implement Training Techniques: Techniques such as the “stop-and-go” (stop walking when they pull and move when the leash is loose) and the “direction change” (turning around when they start to pull) are effective.
- Positive Reinforcement: Reward your dog with treats, praise, or toys when they walk calmly without pulling. This reinforcement makes calm behavior more appealing.
- Consistency and Patience: Regular, consistent training sessions are necessary. Pulling won’t stop overnight, especially if it’s a habit your dog has developed over time.
- Professional Help: Consider working with a professional dog trainer, especially if the pulling is extreme.
What is the Best Collar for a Dog That Stops Pulling?
For dogs that pull, the best types of collars are those that safely help manage the behavior without causing discomfort or harm:
- Martingale Collars: These are better than standard flat collars because they tighten slightly when the dog pulls, providing gentle correction, but they do not choke.
- Head Collars: For severe pullers, head collars like the Gentle Leader can be highly effective. They control the dog’s head, and where the head goes, the body follows, making it easier to direct and control the dog.